jueves, 28 de marzo de 2013

Instant Messaging Services with Openfire on Ubuntu 12.04 LTS (Precise Pangolin)


Openfire is an open source real-time collaboration (instant messaging) server, built on the XMPP protocol and available for multiple platforms. This guide will help you get started with Openfire on your Ubuntu 12.04 LTS (Precise Pangolin) Linux VPS.
If you haven't done so already, please follow the steps outlined in our getting started guide before following these instructions, and make sure your system is fully updated. Initial configuration steps will be performed through the terminal; please make sure you're logged into your Linode as root via SSH.

Prerequisites

Before installing Openfire, make sure your system is up to date. Enter the following commands, one by one, and install any available updates:
sudo apt-get update
sudo apt-get upgrade
Openfire requires a Java runtime engine (JRE). This tutorial uses the OpenJDK provided by the Ubuntu repository. Please note that although alternate Java runtime engines are available, Openfire may not work with them. Enter the following command to install the OpenJDK:
sudo apt-get install openjdk-7-jre
OpenJDK will be installed, along with a series of dependencies it requires.

Adjusting Firewall Settings

If you employ a firewall to specify what ports can be accessed on your VPS, verify that you have the following ports open:
  • 3478 - STUN Service (NAT connectivity)
  • 3479 - STUN Service (NAT connectivity)
  • 5222 - Client to Server (standard and encrypted)
  • 5223 - Client to Server (legacy SSL support)
  • 5229 - Flash Cross Domain (Flash client support)
  • 7070 - HTTP Binding (unsecured HTTP connecitons)
  • 7443 - HTTP Binding (secured HTTP connections)
  • 7777 - File Transfer Proxy (XMPP file transfers)
  • 9090 - Admin Console (unsecured)
  • 9091 - Admin Console (secured)
Additional ports may need to be opened later to support more advanced XMPP services, but these are the ports that Openfire will use by default.

Installing Openfire

Installing Openfire is relatively easy and can be completed in just a couple of steps. Here's how to install Openfire:
  1. Visit the download page for the Openfire RTC server and click the link for the .tar.gz file. You will be taken to another page, which will start the download to your workstation. You may cancel this download, as a manual download link will be presented that you may copy to your clipboard and paste in to the wget command in the next step.
  2. Use wget on your Linode to retrieve the package (substitute the link for the current version in the command below).
    wget http://www.igniterealtime.org/downloadServlet?filename=openfire/openfire_3_7_1.tar.gz
    
  3. Change the name of the download by entering the following command:
    mv downloadServlet\?filename\=openfire%2Fopenfire_3_7_1.tar.gz openfire_3_7_1.tar.gz
    
  4. Untar the software by entering the following command:
    tar -xvzf openfire_3_7_1.tar.gz
    
  5. Move the openfire folder to /opt by entering the following command:
    mv openfire /opt/
    
  6. Edit the configuration file /opt/openfire/conf/openfire.xml, inserting your Linode's public IP address in the <interface> section, and removing the "<!---->" comment markers that surround the <network> section. While not required, this action is helpful if your Linode has multiple IP addresses, and you wish to limit access to a single address.
    File excerpt:/opt/openfire/conf/openfire.xml
    <interface>12.34.56.78</interface>
    
  7. Add a symbolic link for the daemon script to /etc/init.d so that you can start the daemon with a call to service:
    ln -s /opt/openfire/bin/openfire /etc/init.d/
    
  8. Start Openfire with the following command:
    service openfire start
    
This completes the initial installation steps for Openfire. Next, we'll continue with configuration through a web browser.

Configuring Openfire

Configuring Openfire is relatively easy and can be completed in just a couple of steps. Here's how to configure Openfire:
  1. Direct your browser to your Linode's IP address or FQDN (fully qualified domain name, if an entry in DNS points to your Linode's IP) on port 9090. As an example, if your Linode's IP address were 12.34.56.78, you would visit http://12.34.56.78:9090 in your web browser. The webpage shown below appears:
    Language selection in Openfire setup on Ubuntu 12.04 (Precise).
  2. Configure your domain and ports for administration. Use the fully qualified domain name you have assigned to your Linode in DNS. For more infomation: configuring DNS with the Linode Manager).
    Domain and admin ports selection in Openfire setup on Ubuntu 12.04 (Precise).
  3. You may choose to use Openfire's internal database for account management, or you may connect to an external database. Most users will want to choose the built-in option.
    Database type selection in Openfire setup on Ubuntu 12.04 (Precise).
  4. User profiles may be stored in the server database, or they may be pulled from LDAP or Clearspace. Most users will want to choose the default option.
    Profile storage selection in Openfire setup on Ubuntu 12.04 (Precise).
  5. Enter the email address of the default administrative user and select a strong password.
    Administrator account settings in Openfire setup on Ubuntu 12.04 (Precise).
  6. After the initial web-based configuration is complete, restart the Openfire server before attempting to log in with the default "admin" user account. Enter the following commands, one by one:
    service openfire stop
    service openfire start
    
If you're experiencing difficulty using the credentials you just created to log in, please use "admin/admin" as the username/password. You'll need to update your credentials immediately afterward for security purposes. Congratulations! You've successfully installed the Openfire RTC server on Ubuntu 12.04 LTS.

More Information

You may wish to consult the following resources for additional information on this topic. While these are provided in the hope that they will be useful, please note that we cannot vouch for the accuracy or timeliness of externally hosted materials.

miércoles, 27 de marzo de 2013

Install alfresco 4.0 on ubuntu 11.04 using command line


Requirement software for Alfresco

  • Java JDK 6 jdk
  • OpenOffice
  • ImageMagick
  • Flash Player
  • SWF tools
  • TinyMCE language packs
  • Alfresco Module Package
  • Firefox extension

Install JDK 6

You may need to setup the jdk packages for ubuntu in the official repository.

Setup the jdk repository

root@htvlc:~#add-apt-repository ppa:ferramroberto/java
root@htvlc:~#apt-get update

Install jdk

root@htvlc:~#apt-get install sun-java6-jdk

Install OpenOffice

root@htvlc:~#apt-get install openoffice.org

Install ImageMagick

root@htvlc:~#apt-get install imagemagick

Install Flash Player

  • first remove all the old flash plugin
  • secondly install the new flash plugin
root@htvlc:~#apt-get remove flashplugin-* --purge
root@htvlc:~#apt-get install flashplugin-nonfree

Install SWF Tools

Before you install the swf tool, make sure the linux compilers and other depend packages are installed.

Install dependent packages

root@htvlc:~#apt-get install gsfonts libart-2.0-2
       libc6 libfreetype6 libgcc1 libgif4 libjpeg62 libstdc++6 libt1-5 zlib1g gs-common

Install swf tools and setup repository

/etc/apt/sources.list
Add the following in the /etc/apt/sources.list
deb http://ubuntu.mirror.cambrium.nl/ubuntu/ hardy main universe
update the repository
root@htvlc:~#apt-get update
Install swf tools
root@htvlc:/home/sophal# apt-get install swftools

Install TinyMCE language packs

root@htvlc:/home/sophal# apt-get install tinymce

Download Lastest Alfresco

The current version of alfresco that I used to install is Alfresco v4. You may have a newer version. Or you visit the alfresco website athttp://www.alfresco.com/try/ Download to download the alfresco.

Install Alfresco

root@htvlc:/home/sophal# ./alfresco-community-4.0.c-installer-linux-x64.bin 
Language Selection

Please select the installation language
[1] English - English
[2] French - Français
[3] Spanish - Español
[4] Italian - Italiano
[5] German - Deutsch
[6] Japanese - 日本語
[7] Dutch - Nederlands
Please choose an option [1] : 1
----------------------------------------------------------------------------
Welcome to the Alfresco Community Setup Wizard.

----------------------------------------------------------------------------
Installation Type

[1] Easy - Installs servers with the default configuration
[2] Advanced - Configures server ports and service properties.: 
Also choose optional components to install.
Please choose an option [1] : 

miércoles, 20 de marzo de 2013

Encender / Apagar remotamente un PC (Shutdown / Wake On Lan)


Shutdown / Wake On Lan


¿Sabías que es posible encender / apagar un PC de manera remota? Efectivamente, esto es posible y es muy sencillo. 

Probado con Windows XP profesional 

Shutdown

Requisitos

Es necesario que estés en la misma red de área local (LAN) que el PC objetivo, es decir el que deseas apagar de manera remota. Además debes saber el nombre de usuario y la contraseña de una sesión del PC objetivo. 

Puerto 445

Lo primero que debes hacer es comprobar que el puerto TCP 445 esté abierto en el cortafuegos de Windows del PC objetivo. 
Para ello, haz lo siguiente:
  • Dirígete a Inicio > Panel de control: Centro de seguridad
  • Haz clic en Cortafuegos de Windows luego dirígete a la pestaña Excepciones
  • Normalmente aparece una línea "Compartir archivos e impresoras", marca la casilla y haz clic en "Aceptar"
  • Si no te aparece la línea "Compartir archivos e impresoras", haz clic en "Agregar un puerto..." y selecciona el puerto 445 TCP
  • Luego dirígete a Inicio > Panel de control: Sistema en la pestaña "Uso de manera remota". Marca la casilla "Autorizar a los usuarios a conectarse de manera remota a este PC"

Comando

net use

Para obtener los privilegios necesarios para poder ejecutar un comando shutdown en el PC objetivo, debes ejecutar el comando net use. Es necesario obtener la dirección de la máquina objetivo, lo necesitaremos para ejecutar el comando. Para ello:
  • Dirígete a Inicio > Ejecutar (o presiona las teclas Windows + R)
  • Escribe cmd luego haz clic en Aceptar
  • Aparece una ventana DOS, escribe: net use \\ip_máquina_objetivo
  • Ingresa el nombre de usuario de una sesión de la maquina objetivo. Luego la contraseña
  • Aparecerá un mensaje indicando que el comando se ha terminado correctamente

shutdown

Ahora podemos pasar al comando en sí mismo. 
El comando es de este tipo: shutdown -s -f -t 30 - m \\192.168.3.4
  • -s: Apaga el PC
  • -f: Fuerza el cierre de las aplicaciones que se están ejecutando
  • -t xx: Define una cuenta en segundos
  • -m \\xxx.xxx.xxx.xxx: Precisa la dirección IP de la maquina objetivo.


Interfaz gráfica disponible ejecutando: shutdown -i
  • Para obtener ayuda sobre este comando, ejecuta shutdown /?

Además existen muchos programas que realizan lo mismo. 
Si todo se llevo a cabo correctamente, el PC objetivo recibirá un mensaje indicando el cierre del sistema. 

WakeOnLan

  • El Wake On Lan como su nombre lo indica, consisten en encender un ordenador de manera remota a través de la red, enviando un Magic Packet a la tarjeta de red del ordenador objetivo.
  • Importante: no todas las tarjetas de red ni las BIOS son compatibles con la recepción de los Magic Packet.

Requisitos

Para realizar esta operación es necesario que el PC de origen se encuentre en la misma red de area local (LAN) que el ordenador objetivo (el que quieres encender de manera remota) 
También es necesario conocer la dirección física (MAC) y la dirección IP del ordenador objetivo. 

MAC & IP

Lo primero que debes hacer es conseguir la dirección IP y la dirección MAC del ordenador objetivo:
  • Dirígete a Inicio > Ejecutar o presiona simultáneamente la tecla de Windows + R
  • Escribe cmd y haz clic en Aceptar
  • En la ventana DOS que aparece, escribe ipconfig/all

  • Toma nota de la dirección física (MAC) y la dirección IP

Tarjeta de red

Para ver si tu tarjeta de red es compatible, sigue estos pasos:
  • Haz clic derecho sobre Equipo y selecciona Administrar
  • Entra a Administrador de dispositivos > Adaptadores de red
  • Haz clic derecho sobre tu tarjeta de red y selecciona "Propiedades"
  • Una vez en Propiedades, debes buscar las palabras "Magic Packet", "Wake On Magic Packet", "Wake On Lan". Comprueba que todas las opciones estén activadas.
  • Si no encuentras estas opciones, quizás necesites actualizar tu tarjeta de red. Dirígete a la página del fabricante de la tarjeta.
  • Reinicia el ordenador objetivo.

BIOS


Para ver si tu BIOS es compatible, haz lo siguiente:
  • Reinicia el PC y entra a la BIOS presionando la tecla necesaria según la BIOS (ESC, F2, F5, F12, DEL)
  • Una vez en la BIOS, entra a las opciones de alimentación (POWER) y activa la opción Wake-on-Lan, o similar.

Cortafuegos

Abre el puerto 8900 del mismo modo que el puerto 445. 

WOL

  • Lo primero que debes hacer es descargar en el PC de origen, un pequeño programa Wake-on-Lan (WOL) de aquí
  • Esta es su interfaz:

  • Rellena los campos con la información obtenida más arriba
    • Mac Adress: dirección MAC (de la máquina objetivo)
    • Internet Adress: dirección IP local (de la máquina objetivo)
    • Subnet Mask: 255.255.255.255
    • Send Options: Local Subnet
    • Remote Port Number: 8900
  • Haz clic en el botón Wake Me Up


Una vez recibido el paquete, el PC objetivo debería encenderse. 

Desde Internet

En teoría, es posible encender el PC desde Internet, tan solo hay que configurar el router para redirigir un paquete UDP de un puerto especifico a todos los PCs de la red. En la práctica, solo es posible en algunos routers. Si envías el magic packet a tu dirección IP publica y al puerto correcto mediante el programa mencionado más arriba, tu PC se encenderá. Una sola configuración del router servirá para todos los PCs, pero cada PC será encendido independientemente de los otros, gracias a su magic packet personalizado. 

Por teléfono

Si deseas encender tu PC sin que te encuentres en casa, necesitarás un modem RTC externo sobre puerto serie RS-232 (un poco antiguo). Conecta el modem a tu PC, y activa la opción de tu BIOS "wake on modem ring" . De este modo, cuando el modem esté encendido, si tu teléfono suena, tu PC se encenderá...Este modem se conecta muy bien en la línea telefónica IP del router, tu teléfono deberá ser conectado en paralelo al modem. 

El inconveniente es que tu PC se encenderá (si el modem está encendido) a cada llamada telefónica...Personalmente yo ejecuto el comando siguiente en "Inicio > Ejecutar": 
shutdown -s -t 300 que apaga el PC al cabo de 5 minutos. Un acceso directo del comando shutdown -aen el escritorio permite anular el apagado cuando estás delante del PC. El comando de anulación puede ser lanzado de manera remota mediante VNC, un script PHP (exec), o cualquier otro método de ejecución de código de manera remota.

message archiving broken in 3.8.0

http://community.igniterealtime.org/thread/49324

martes, 19 de marzo de 2013

How can I force Ubuntu to boot on a stuck boot menu?


he answer to this one can be found in the grub file /etc/grub.d/00_header
make_timeout ()
{
    cat << EOF
if [ "\${recordfail}" = 1 ]; then
  set timeout=-1
else
  set timeout=${2}
fi
EOF
}
Setting the timeout value to -1 will stop the count down. Change the value to a value > 0 i.e. set timeout=10
this section of the file would look like
make_timeout ()
{
    cat << EOF
if [ "\${recordfail}" = 1 ]; then
  set timeout=10
else
  set timeout=${2}
fi
EOF
}
Then run
sudo update-grub2

jueves, 14 de marzo de 2013

How To Install And Configure SAMBA In Debian Squeeze


If you want to share files between your Debian and Windows computers, your best option is to use Samba file sharing.debian
Samba is a free software re-implementation of SMB/CIFS networking protocol, originally developed by Australian Andrew Tridgell. As of version 3, Samba provides file and print services for various Microsoft Windows clients and
can integrate with a Windows Server domain, either as a Primary Domain Controller (PDC) or as a domain member. It can also be part of an Active Directory domain.Samba runs on most Unix and Unix-like systems, such as Linux, Solaris, AIX and the BSD variants, including Apple’s Mac OS X Server (which was added to the Mac OS X client in version 10.2). Samba is standard on nearly all distributions of Linux and is commonly included as a basic system service on other Unix-based operating systems as well. Samba is released under the GNU General Public License. The nameSamba comes from SMB (Server Message Block), the name of the standard protocol used by the Microsoft Windows network file system.  (Wikipedia)
1-Specify  the  Samba Server
lets give my example server with IP 192.168.58.142

2- Install Samba
open  terminal and  install samba package and dependencies
$sudo apt-get install libcupsys2 samba samba-common
You will see the following questions:
Workgroup/Domain Name: <– WORKGROUP
Enter a workgroup name
Edit the smb.conf file using the command:
vi /etc/samba/smb.conf
Now activate  the  line security = user
[...]
# “security = user” is always a good idea. This will require a Unix account
# in this server for every user accessing the server. See
# /usr/share/doc/samba-doc/htmldocs/Samba3-HOWTO/ServerType.html
# in the samba-doc package for details.
security = user
[...]
This enables Linux system users to log in to the Samba server.
save , exit and restart Samba:
/etc/init.d/samba restart

3- Add the Samba Shares
This will add a share that will be accessible from  all users.
Create the directory for sharing the files and change the group to the users group:
mkdir -p /home/samba-share/allusers
chown -R root:users /home/samba-share/allusers/
chmod -R ug+rwx,o+rx-w /home/samba-share/allusers/
At the end of the file /etc/samba/smb.conf add the following lines:
First open the smb.conf file using the command:
vi /etc/samba/smb.conf
and add:
[allusers]
comment = All Users
path = /home/samba-share/allusers
valid users = @users
force group = users
create mask = 0660
directory mask = 0771
writable = yes
If you want all users to be able to read and write to their home directories via Samba, add the following lines to /etc/samba/smb.conf:
[...]
[homes]
comment = Home Directories
browseable = no
valid users = @users
writable = yes
create mask = 0700
directory mask = 0700
save and restart Samba:
/etc/init.d/samba restart

Dont  forget  to set  read only  to  noin the config file
# By default, the home directories are exported read-only. Change the# next parameter to 'no' if you want to be able to write to them. read only = no
4 Add and manage the Users
In this example, I will add a user named tom. You can add as many users as you need in the same way, just replace the username tom with the desired username in the commands.
useradd  samba-user -m -G users
Set a password for samba-user in the Linux system .
-> Enter the password for the new user.
root@unixmen-debian6:~# passwd samba-userOutputEnter new UNIX password: Retype new UNIX password: 
Now add the user to the Samba user database:
root@unixmen-debian6:~# smbpasswd -a samba-userOutputNew SMB password:Retype new SMB password:Added user samba-user.root@unixmen-debian6:~# 
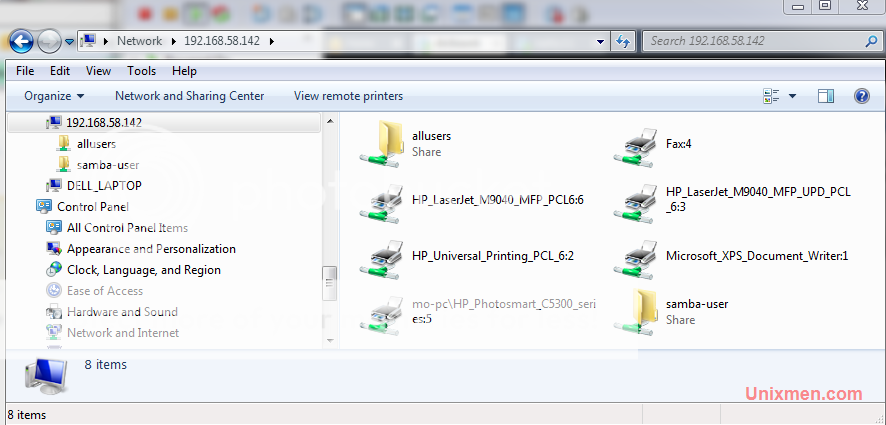
Now you should be able to log in from your Windows workstation with the file explorer (address is 192.168.58.142  or 192.168.58.142samba-user  for samba-user  home directory)
login to the samba server
login to you home  directory
For questions please refer to our Q/A forum at : http://ask.unixmen.com